Fall 2023
Pruning to Control Growth
by Anne Sutherland
Pruning during dormancy invigorates trees. Pruning when a tree is leafed out in summer and fall will reduce the next season’s growth and is the best way to reduce its size. Removing leaves decreases the energy the tree receives from the sun, energy that the tree uses to manufacture fruit and for its own nourishment. Therefore, summer pruning is best done after fruit harvest or after flowering if it’s a landscape tree or shrub. Summer pruning refines the structure you build during dormancy.
An exception to this practice is when branches are weighed down by excess fruit in early spring. The spacing between fruits should be about six inches, and the fruit needs to be removed when it is golf-ball-sized or slightly smaller. Another exception is when the leaves are changing into fall colors. Energy is flowing from the leaves into the roots to prepare for dormancy, and this flow should not be disrupted.
Removing leaves in the summer risks sunburn. To protect exposed branches, a 1:1 mix of water and interior water-soluble white latex paint can be applied to the branches if the tree receives hot, direct sunlight.
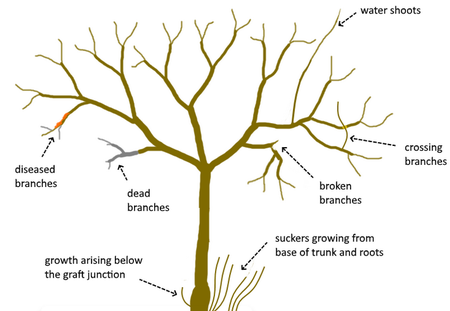
Deciding what to remove is straightforward if you got the tree off to a good start when it was young. Upright vegetative growth, particularly in the center of the tree, should be removed; it’s blocking sunlight and not making much fruit, if any. This growth is commonly called a water sprout (or shoot) because it steals water and nutrients from the productive parts of the tree. Make the removal cuts all the way back to the nearest strong limb. Leaving a stump invites disease and pests because the tree cannot seal over the cut.
Root suckers should also be removed (see diagram). Many trees, especially fruit trees, are grafted onto rootstock, which produces root suckers that are typically not productive of good, abundant fruit. The root suckers use energy that should be directed to the fruiting or flowering portion of the tree. These suckers should be cut all the way back to the root, if possible, which may require some gentle digging.
“The Four D’s” should always be removed: dead, diseased, damaged, and deformed or deranged branches. Deformed or deranged branches include crowded, crossing branches, downgoing branches, and competing branches. Crowded and competing branches take too much of the tree’s energy to maintain and hinder each other’s growth. Downgoing branches are subject to disease and pests if they are too close to the ground. Crossing branches can rub wounds into each other and are an entry point for disease.
Apricots and apricot hybrids, grapes, and cherries should always be pruned during dry weather, as these fruits are prone to a fungus called Eutypa. Pruning them when a winter rain could arrive within two weeks’ time risks infecting them with this fungus.
How to Make Pruning Cuts
In general, the Four D’s should be cut back to the next large branch. This is called a removal or thinning cut. Branches that you want to develop, either for appearance, fruit, or flowers, should be cut back to a bud or branch. See the diagram below. Lateral branches are more productive of fruit than upright branches. The ideal angle is 45°.
A few large pruning cuts accomplish more than many small cuts. If your tree is large, large branches may need to be removed. Three considerations are key:
- A 1-2-3, also called a jump-cut, is the safest way to remove a branch that is an inch or more in diameter. Make the first cut on the underside of the branch. Make the second cut on the top, close to the first cut. The branch should then fall without tearing the bark. Make the third cut near the bark branch ridge, which is a subtle thickening of the bark near the next largest branch or the trunk. This thickening contains cells that will heal the cut. Cutting too close will damage the ridge. Cutting too far away (leaving a stump) prevents the healing cells from reaching the wound and is an entry point for disease and pests.
- Sealants should not be used on the cut. Research has shown that disease and pests can be sealed in, rather than kept out.
- If the branch is larger than two to four inches in diameter, the advice and services of a Certified Arborist may be needed. Branches this large can be dangerous for the homeowner to handle, especially if structures, power lines, or ladders are involved. Look for a Certified Arborist at www.treesaregood.org.
Tool Care
Good tools can make pruning a satisfying experience. Below is a list of tools typically needed:
- Hand pruning shears
- Lopping shears (loppers) with 24”–30” handles
- A folding or fixed-handled pruning saw with 8”–15” curved blades and wide-set teeth
- Safety glasses
- Work gloves
Folding ladders and extension ladders are unsafe and not designed for unstable ground or tree work. An orchard (tripod) ladder is safer and can get close to the tree. If you need a ladder and the branch is big enough to require a pruning saw, consider consulting a Certified Arborist.
Good tools can be a bit pricey, but if well cared for, they will give you years of service. After fall, pruning is a logical time to attend to them. A hand-held carbide sharpener is inexpensive and easy to use. Sharp pruners are less likely to injure the twigs and branches. Scissoring or bypass pruners are best for branches and twigs you care about, as they do not crush plant tissue. Anvil pruners are acceptable for branches that are dead or have been removed.
- Wire brush and steel wool for build-up
- Turpentine to clean off pitch and sap
- Alcohol or 10% bleach solution to sanitize (alcohol is easier)
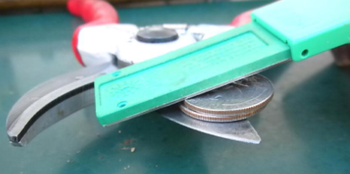
- Sharpening system – maintain bevel (see first photo of pruners below)
- Oil to prevent corrosion (even kitchen oil will work)
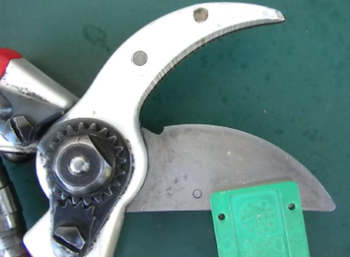
- Make sure the connecting screw is tight (see second photo of pruners below)
What to prune
Cut all the way back to next large branch – see red lines.

How to do pruning cuts

The 1-2-3 or Jump Cut

Make the first cut at A
Make the second cut at B
Make the third cut at C-D
Don't cut into the bark branch ridge at E-F
Don't cut at G-H, on the wrong side of the bark branch ridge
Tool Care


References
Big picture pruning:
https://homeorchard.ucanr.edu/The_Big_Picture/Pruning_&_Training/
“Pruning: More than Making Cuts”: https://marinmg.ucanr.edu/CARE/HOWTOPRUNE/
This reference has a Glossary.
Tool care:
https://ccmg.ucanr.edu/our-blog/?blogpost=55781&blogasset=12496
“How to Clean and Sharpen Pruning Tools,” UC Master Gardeners of Santa Clara County, 2015:
https://www.youtube.com/watch?v=vROuLbOuYq0
Previous ‘News to Grow By’ articles:
Fall 2022:
Fall Pruning by Anne Sutherland:
https://ccmg.ucanr.edu/News_to_Grow_By/?story=2510
Fall 2021:
Pruning in small spaces by David George:
https://files.constantcontact.com/c2115e3d101/25daec98-0fa3-4d38-99d0-ca317f27514d.pdf
